Creative Coding in Rust for a Seven-Colour E-Ink Display
After trying creative coding on a monochrome e-ink device, I wanted to try colour.
Let's use a Pimoroni Inky Frame 5.7 to make a generative art frame that draws a new picture every hour.
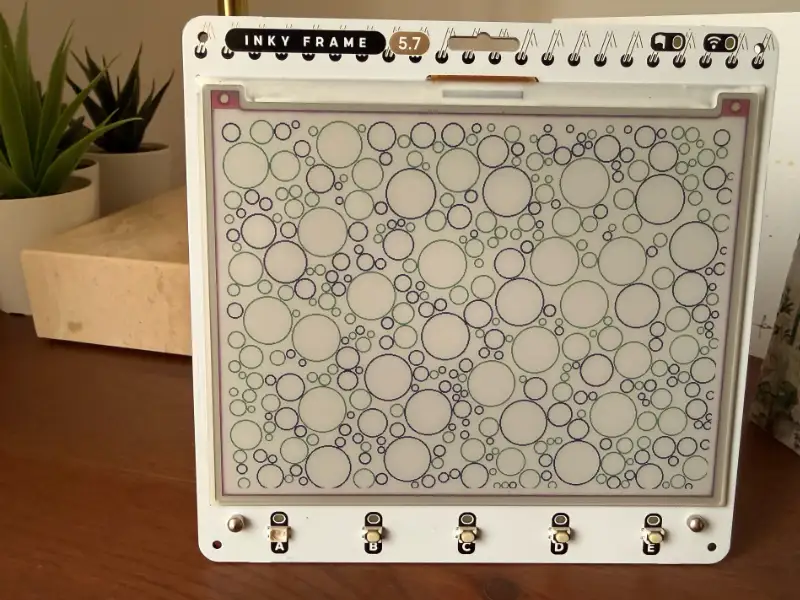
We'll use Rust again, with drawing code that runs on both the desktop and the microcontroller. This lets us preview a picture as a PNG before sending the same pixels to the display.
We'll build the drawing library and desktop preview first, then look at the firmware needed to update the screen and wake up for the next picture.
The examples use the Inky Frame 5.7, with an RP2040 and a 600 × 448 seven-colour panel. You can follow the drawing and preview sections with just Rust installed.
Connecting the display also needs startup code, peripheral configuration and a driver for this panel. Other models need their own dimensions, palette and board support.
Working with seven colours
The panel supports black, white, green, blue, red, yellow and orange. Each pixel must use one of these; there is no transparency or arbitrary RGB colour.
A full refresh takes roughly 30 seconds, so desktop previews save a lot of waiting. The display suits pictures that change hourly or daily, rather than an interactive UI.
Start with large shapes, clear gaps and two or three colours. Gradients need dithering: small patterns of the available colours that suggest intermediate shades.
The preview reproduces the pixels, but its RGB colours only approximate the physical ink. Try promising designs on the panel to see how they look under real lighting.
Separating drawing from hardware
We'll create three things:
- A portable library turns a seed into a framebuffer: an array containing the image's pixels.
- A desktop executable reads that buffer and writes a PNG.
- Firmware passes the buffer to a display driver and manages the board's power.
Assuming you have Rust installed, create a library package:
cargo new --lib inky-sketchbook
cd inky-sketchbook
mkdir -p examples
Replace Cargo.toml with:
[package]
name = "inky-sketchbook"
version = "0.1.0"
edition = "2024"

[dependencies]
embedded-graphics = "0.8"

[target.'cfg(not(target_os = "none"))'.dev-dependencies]
png = "0.18"
embedded-graphics provides drawing primitives. The PNG encoder is a development dependency restricted to ordinary operating systems, so it stays out of the embedded build.
Replace src/lib.rs with:
#![no_std]

pub mod framebuffer;
pub mod pen;
pub mod sketch;
#![no_std] makes the library use Rust's core library instead of std. It has no filesystem or operating-system services. The desktop executable can still use std while calling this library.
Keep the default compilation target as your desktop for now. That makes cargo run --example preview work without a target override. We will check the embedded target separately.
Representing the palette
We'll give each physical ink its own enum value. For this panel's packed format, codes 0 to 6 represent the seven colours.
Create src/pen.rs:
use embedded_graphics::{pixelcolor::raw::RawU4, prelude::PixelColor};

#[derive(Copy, Clone, Debug, Default, Eq, PartialEq)]
#[repr(u8)]
pub enum Pen {
    Black = 0,
    #[default]
    White = 1,
    Green = 2,
    Blue = 3,
    Red = 4,
    Yellow = 5,
    Orange = 6,
}

impl Pen {
    pub const PALETTE: [Self; 7] = [
        Self::Black,
        Self::White,
        Self::Green,
        Self::Blue,
        Self::Red,
        Self::Yellow,
        Self::Orange,
    ];

    pub const fn code(self) -> u8 {
        self as u8
    }

    pub const fn rgb(self) -> [u8; 3] {
        match self {
            Self::Black => [0, 0, 0],
            Self::White => [255, 255, 255],
            Self::Green => [0, 180, 0],
            Self::Blue => [0, 70, 210],
            Self::Red => [220, 20, 30],
            Self::Yellow => [245, 220, 0],
            Self::Orange => [240, 120, 0],
        }
    }
}

impl PixelColor for Pen {
    type Raw = RawU4;
}
PixelColor connects our enum to embedded-graphics. RawU4 specifies a four-bit representation, and PALETTE gives sketches a list of colours to choose from.
Packing pixels into bytes
A four-bit pixel occupies half a byte, a 'nibble'. Put the first pixel in the high nibble and the next in the low nibble. A row runs left to right, followed by the next row.
byte 0: [pixel 0 | pixel 1]
byte 1: [pixel 2 | pixel 3]
At 600 × 448 pixels, the buffer takes 134,400 bytes, or about 131 KiB. This fits in the RP2040's RAM, but two complete buffers would consume almost all of it before accounting for the stack and other state.
Create src/framebuffer.rs:
use crate::pen::Pen;
use embedded_graphics::{prelude::*, primitives::Rectangle};

pub const WIDTH: u32 = 600;
pub const HEIGHT: u32 = 448;
pub const BUFFER_LEN: usize = (WIDTH as usize * HEIGHT as usize) / 2;

pub struct FrameBuffer {
    data: [u8; BUFFER_LEN],
}

impl FrameBuffer {
    pub const fn new() -> Self {
        Self {
            data: [0; BUFFER_LEN],
        }
    }

    pub fn set_pixel(&mut self, x: i32, y: i32, pen: Pen) {
        if x < 0 || y < 0 || x >= WIDTH as i32 || y >= HEIGHT as i32 {
            return;
        }
        let offset = y as usize * WIDTH as usize + x as usize;
        let byte = &mut self.data[offset / 2];
        if offset & 1 == 0 {
            *byte = (*byte & 0x0f) | (pen.code() << 4);
        } else {
            *byte = (*byte & 0xf0) | pen.code();
        }
    }

    pub fn pixel(&self, x: i32, y: i32) -> Option<Pen> {
        if x < 0 || y < 0 || x >= WIDTH as i32 || y >= HEIGHT as i32 {
            return None;
        }
        let offset = y as usize * WIDTH as usize + x as usize;
        let byte = self.data[offset / 2];
        Some(
            match if offset & 1 == 0 {
                byte >> 4
            } else {
                byte & 0x0f
            } {
                0 => Pen::Black,
                1 => Pen::White,
                2 => Pen::Green,
                3 => Pen::Blue,
                4 => Pen::Red,
                5 => Pen::Yellow,
                6 => Pen::Orange,
                _ => return None,
            },
        )
    }

    pub fn fill(&mut self, pen: Pen) {
        let pair = (pen.code() << 4) | pen.code();
        self.data.fill(pair);
    }

    pub fn as_bytes(&self) -> &[u8; BUFFER_LEN] {
        &self.data
    }
}

impl OriginDimensions for FrameBuffer {
    fn size(&self) -> Size {
        Size::new(WIDTH, HEIGHT)
    }
}

impl DrawTarget for FrameBuffer {
    type Color = Pen;
    type Error = core::convert::Infallible;

    fn draw_iter<I>(&mut self, pixels: I) -> Result<(), Self::Error>
    where
        I: IntoIterator<Item = Pixel<Self::Color>>,
    {
        for Pixel(point, pen) in pixels {
            self.set_pixel(point.x, point.y, pen);
        }
        Ok(())
    }

    fn clear(&mut self, pen: Pen) -> Result<(), Self::Error> {
        self.fill(pen);
        Ok(())
    }

    fn fill_solid(&mut self, area: &Rectangle, pen: Pen) -> Result<(), Self::Error> {
        let clipped = area.intersection(&self.bounding_box());
        for y in clipped.rows() {
            for x in clipped.columns() {
                self.set_pixel(x, y, pen);
            }
        }
        Ok(())
    }
}
set_pixel changes one nibble while preserving its neighbour. For example, black followed by red produces 0x04; changing the first pixel to blue produces 0x34.
We also clip here: negative coordinates and points beyond the image are ignored. A sketch can then draw a circle partly outside the frame without checking each pixel itself.
Implementing DrawTarget lets the library draw shapes into this buffer. clear fills pairs of pixels at once.
The constructor fills the array with zeroes, which means black. Each sketch should explicitly clear to its chosen background before drawing. The zeroed constructor will also be useful for static allocation in firmware.
Repeating a composition with a seed
A seed selects a sequence of pseudo-random values. Keep the code and settings unchanged, and the same seed recreates the same picture. This is useful both for experimenting and for reproducing bugs.
Create src/sketch.rs:
use crate::{
    framebuffer::{FrameBuffer, HEIGHT, WIDTH},
    pen::Pen,
};
use embedded_graphics::{
    prelude::*,
    primitives::{Circle, Line, PrimitiveStyle},
};

pub struct Rng {
    state: u64,
}

impl Rng {
    pub fn new(seed: u64) -> Self {
        let mut rng = Self { state: 0 };
        rng.next_u32();
        rng.state = rng.state.wrapping_add(seed);
        rng.next_u32();
        rng
    }

    pub fn next_u32(&mut self) -> u32 {
        let old = self.state;
        self.state = old
            .wrapping_mul(6_364_136_223_846_793_005)
            .wrapping_add(1_442_695_040_888_963_407);
        let word = (((old >> 18) ^ old) >> 27) as u32;
        word.rotate_right((old >> 59) as u32)
    }

    pub fn below(&mut self, limit: u32) -> u32 {
        // Adequate for artwork; use rejection sampling if exact uniformity matters.
        ((self.next_u32() as u64 * limit as u64) >> 32) as u32
    }
}

pub fn draw(frame: &mut FrameBuffer, seed: u64) {
    let mut rng = Rng::new(seed);
    frame.clear(Pen::White).unwrap();

    // A simple "constellation": circles joined to their previous neighbour.
    let mut previous = Point::new((WIDTH / 2) as i32, (HEIGHT / 2) as i32);
    for i in 0..48 {
        let point = Point::new(
            rng.below(WIDTH - 40) as i32 + 20,
            rng.below(HEIGHT - 40) as i32 + 20,
        );
        let ink = if i % 5 == 0 { Pen::Orange } else { Pen::Blue };
        Line::new(previous, point)
            .into_styled(PrimitiveStyle::with_stroke(ink, 1))
            .draw(frame)
            .unwrap();
        let diameter = 3 + rng.below(14);
        Circle::with_center(point, diameter)
            .into_styled(PrimitiveStyle::with_fill(ink))
            .draw(frame)
            .unwrap();
        previous = point;
    }
}
The generator uses a small PCG-style calculation with wrapping arithmetic. It mixes in the seed before drawing. This is suitable for artwork, but not for security.
below puts the result in a bounded range. It has a small distribution bias, which is fine here. Use rejection sampling if you need exactly uniform choices.
The sketch clears to white, picks points inside a margin, then joins them with blue or orange lines. Filled circles mark the points. A new seed changes the arrangement while keeping the same style.
These drawing calls only write to memory, so their results are infallible. Sending the image to hardware can fail and needs separate error handling.
Creating a PNG preview
The preview reads the packed framebuffer itself. This lets us check the bytes that will reach the display, including any mistakes in how we pack the pixels.
Create examples/preview.rs:
use inky_sketchbook::{
    framebuffer::{FrameBuffer, HEIGHT, WIDTH},
    sketch,
};
use std::{
    fs::{File, create_dir_all},
    io::BufWriter,
    path::Path,
};

fn main() {
    let argument = std::env::args().nth(1).unwrap_or_else(|| "5eed".into());
    let seed = u64::from_str_radix(argument.trim_start_matches("0x"), 16)
        .expect("pass a hexadecimal seed, for example 0xbeef");

    // A local buffer is fine for this desktop example.
    let mut frame = FrameBuffer::new();
    sketch::draw(&mut frame, seed);

    let mut rgb = Vec::with_capacity((WIDTH * HEIGHT * 3) as usize);
    for y in 0..HEIGHT as i32 {
        for x in 0..WIDTH as i32 {
            rgb.extend_from_slice(&frame.pixel(x, y).unwrap().rgb());
        }
    }

    create_dir_all("preview").unwrap();
    write_png(Path::new("preview/latest.png"), &rgb);
    println!("preview/latest.png, seed = 0x{seed:016x}");
}

fn write_png(path: &Path, rgb: &[u8]) {
    let file = File::create(path).unwrap();
    let mut encoder = png::Encoder::new(BufWriter::new(file), WIDTH, HEIGHT);
    encoder.set_color(png::ColorType::Rgb);
    encoder.set_depth(png::BitDepth::Eight);
    encoder
        .write_header()
        .unwrap()
        .write_image_data(rgb)
        .unwrap();
}
Here the framebuffer is an ordinary desktop variable. The larger RGB array exists only while writing the PNG; firmware will send the packed bytes directly and will not need that conversion buffer.
Run the example from the package directory:
cargo run --release --example preview -- 0xbeef
The argument is hexadecimal, with or without 0x. Invalid input produces an error instead of silently selecting another composition. With no argument, the seed defaults to 0x5eed.
Open preview/latest.png. This is the output from the code above with seed 0xbeef:
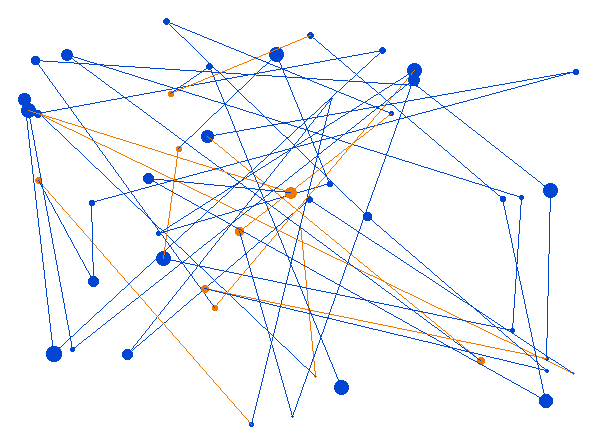
Try another seed, change the point count or adjust the circle sizes. Keep the seed fixed while changing one drawing rule so you can see what that rule does.
For a larger sketchbook, save each image under its seed and arrange a batch into a contact sheet. Record the code revision too: a seed only reproduces an image while the algorithm and settings stay the same.
Running on the board
The portable code needs no changes to compile for the RP2040. Install its Cortex-M0+ target and check the library:
rustup target add thumbv6m-none-eabi
cargo check --lib --target thumbv6m-none-eabi
This checks that the drawing library compiles for the board. A flashable application also needs an entry point, linker memory map, panic handler and configured peripherals.
Use a separate firmware package that depends on the drawing library by path. For sibling firmware and inky-sketchbook directories, add this to the firmware's dependencies:
inky-sketchbook = { path = "../inky-sketchbook" }
Embassy's RP examples provide starting points for async firmware. Use matching dependency versions and linker configuration from one example.
Keep its board target and runner settings inside the firmware package. If you put both packages in a workspace, pass --target thumbv6m-none-eabi explicitly when building firmware to keep desktop previews straightforward.
The Embedded Rust Book explains startup and linking if those are unfamiliar. Check the memory map against your board's flash and RAM before building the application.
Allocate the framebuffer once
Do not construct the 134,400-byte framebuffer as a local variable on the embedded stack. Put it in static storage and take one mutable reference during startup.
ConstStaticCell supports this pattern. In the firmware package, add static_cell = "2.1" and use:
use inky_sketchbook::framebuffer::FrameBuffer;
use static_cell::ConstStaticCell;

static FRAME: ConstStaticCell<FrameBuffer> =
    ConstStaticCell::new(FrameBuffer::new());

// Inside the firmware entry point, once:
// let frame = FRAME.take();
On the RP2040, enable portable-atomic's critical-section feature and provide a critical-section implementation through the HAL. static_cell needs this for atomic operations on the Cortex-M0+.
The zeroed array can live in .bss, taking RAM without storing another image-sized array in flash. Check memory usage after linking, allowing room for async tasks, driver state and the stack.
Updating the display
The board code needs an update function that borrows the framebuffer. It should initialise the panel, send frame.as_bytes(), request a refresh and wait for it to finish.
Pimoroni's UC8159 driver shows the command sequence for this display.
The driver manages SPI, chip-select, data/command and reset. It also needs to read BUSY, with a timeout so a failed refresh doesn't leave the app waiting forever.
On this Inky Frame, BUSY and the buttons are read through a shift register. The board support code shows how.
Borrow the framebuffer during transfer to avoid copying it. If the driver uses DMA, keep the borrow until DMA completes so drawing cannot overwrite pixels being sent.
The drawing code is now complete. GPIO setup, panel commands and power control belong in the board code, as these details vary between models and panel revisions.
Waking from battery sleep
The Inky Frame can turn off the processor and display while keeping its real-time clock powered. Finish the refresh, put the panel into low-power mode, then set the next wake event before releasing the power-hold signal.
Follow the board's reference code for RTC setup and power control, including clearing old RTC interrupt flags. The order matters.
The next wake starts the firmware again from the beginning. A seed counter kept only in RAM would reset, repeating the picture. Use the RTC time or save a counter before shutdown.
With USB connected, releasing the hold signal may leave the processor running. For development, use a loop that waits and redraws. On batteries, draw once, schedule the next wake and power down.
Checking the result
Start with checks that isolate one source of failure at a time:
- Pixel packing: set neighbouring pixels to different colours and check the byte value, not just the PNG. Encoding and decoding can share the same mistake.
- Orientation: draw different markers in all four corners, then compare the desktop and panel to expose rotation or mirroring.
- Hardware startup: blink an LED and check reset and BUSY transitions before transferring artwork.
- Palette: display solid fills for all seven inks to verify codes and controller configuration.
- Reproducibility: compare the same seed on the desktop and device. Match geometry first, then assess colour.
- Power: test a complete RTC wake, refresh and shutdown cycle on batteries after USB updates work.
Wrong shapes suggest addressing or orientation problems. Correct shapes with wrong colours suggest palette codes or nibble order.
A reset during refresh can indicate a power problem. A linker error near the RAM limit may mean there is a second copy of the buffer.
Trying more sketches
Once this works, try another algorithm with the same draw(frame, seed) interface. Circle packing, recursive subdivision and Truchet tiles all suit a limited palette.
The contact sheet below shows separate circle-packing sketches as an example of what to try next. It isn't output from the constellation code above.
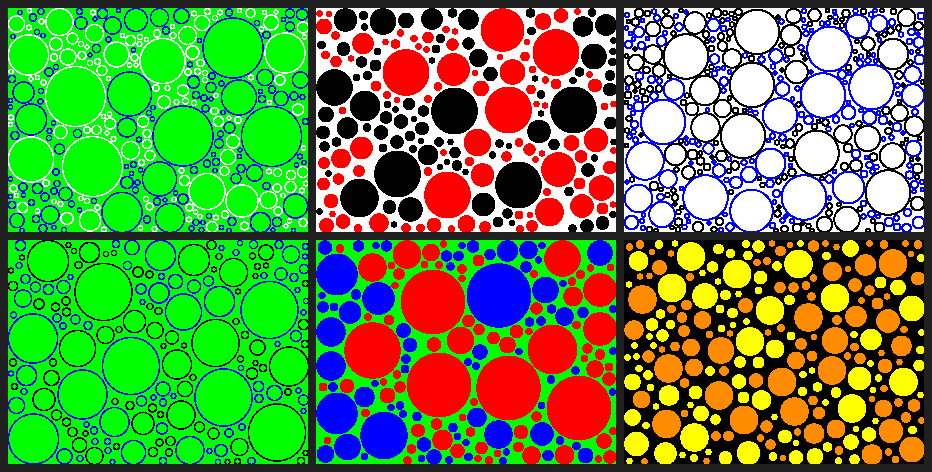
Look through a batch for crowded edges, gaps and weak contrast. Adjust the parameter ranges to improve the set as a whole.
With the framebuffer and seeded drawing function in place, most experiments can happen on the desktop. Use the panel to judge how the finished pictures look in ink.