An Introduction to Embedded Rust Development on an E-Ink Device
I picked up a Pimoroni Badger 2040 some time ago and never did much with it. It ships with MicroPython, but I wanted to try bare-metal Rust.
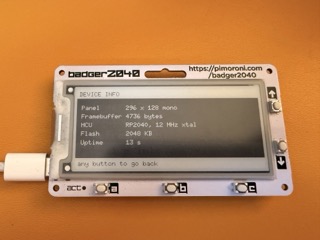
It has an RP2040 with two Cortex-M0+ cores, 264K of SRAM and 2MB of flash. The 296 × 128 monochrome e-ink panel uses a UC8151 controller, and there are six buttons. Here is what getting it running involved.
Setup
I created a Rust project with Cargo's defaults, then asked Claude to set up the board support. Here is the initial prompt:
I have a eink badger 2040 plugged into this Macbook via usb-c

I would like to create and run a hello world project in Rust on it

probably using the uc8151 crate

please do this (giving me instructions for any external steps)
It worked first time. I then asked for separate binaries so I could run different 'apps'. Here are a few things I built.
Hello world
embedded-graphics provides fonts, shapes and a Drawable trait. The uc8151 driver implements DrawTarget for the panel, so we can use the usual drawing API:
#![no_std]
#![no_main]

use badgeable::{Board, InkCanvas, UpdateSpeed, WIDTH};

#[entry]
fn main() -> ! {
    let mut board = Board::init(pac::Peripherals::take().unwrap(), UpdateSpeed::Normal);

    board.display.fill_paper();

    board.display.bounding_box()
        .into_styled(PrimitiveStyle::with_stroke(BinaryColor::On, 2))
        .draw(&mut board.display)
        .unwrap();

    Text::with_alignment(
        "Hello, world!",
        Point::new((WIDTH / 2) as i32, 58),
        MonoTextStyle::new(&FONT_10X20, BinaryColor::On),
        Alignment::Center,
    )
    .draw(&mut board.display)
    .unwrap();

    board.display.update().unwrap();

    loop {
        board.led.set_high().unwrap();
        board.timer.delay_ms(500u32);
        board.led.set_low().unwrap();
        board.timer.delay_ms(500u32);
    }
}
The LED blinks at the end to show that the code ran. main returns !, meaning it never returns: there is no operating system to return to.
Generative art
I often use generative art to explore new hardware or graphics libraries.
Most of this is ordinary Rust code, with two constraints: we have no allocator, and the Cortex-M0+ has no floating-point unit.
Hashing for random tiles
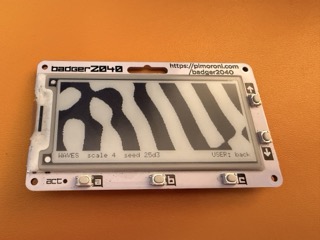
Each generator is a pure function of (seed, scale), so the same settings recreate the same image. A hash chooses each tile from its coordinates, without allocating a grid of tile states:
/// Deterministic hash of a grid cell. Lets a generator decide a tile's
/// contents from `(seed, x, y)` alone, with no per-tile state to store.
pub fn hash2(seed: u32, x: i32, y: i32) -> u32 {
    let mut h = seed ^ (x as u32).wrapping_mul(0x9e37_79b9)
                     ^ (y as u32).wrapping_mul(0x85eb_ca6b);
    h ^= h >> 16;
    h = h.wrapping_mul(0x7feb_352d);
    h ^= h >> 15;
    h = h.wrapping_mul(0x846c_a68b);
    h ^ (h >> 16)
}
Truchet tiles
Each Truchet tile has two quarter-arcs centred on opposite corners. Whichever orientation we choose, the curves meet at the tile edges to form longer paths:
fn truchet(d: &mut Display, seed: u32, s: i32, fg: bool) {
    let r = s / 2;
    // The arc band has to stay thin relative to the tile. Fatten it and the
    // two arcs swallow the tile and the pattern collapses into a uniform grid.
    let t = s / 14;
    for y in 0..H {
        let (ty, fy) = (y.div_euclid(s), y.rem_euclid(s));
        for x in 0..W {
            let (tx, fx) = (x.div_euclid(s), x.rem_euclid(s));
            let flip = hash2(seed, tx, ty) & 1 == 1;
            let (ax, ay, bx, by) = if flip { (s, 0, 0, s) } else { (0, 0, s, s) };
            if (dist(fx - ax, fy - ay) - r).abs() <= t
                || (dist(fx - bx, fy - by) - r).abs() <= t
            {
                d.set_ink(x, y, fg);
            }
        }
    }
}
dist uses integer isqrt to avoid software floating-point operations on the M0+. For an example with three radial sine waves, libm::sinf was fast enough at 296 × 128 pixels.
For other random values I used a small xorshift generator. heapless::String<48> handles text formatting with space for 48 bytes:
let mut left: String<48> = String::new();
write!(left, "{}  scale {}  seed {:04x}", p.gen.name(), p.scale + 1, p.seed & 0xffff).ok();
For a new seed, I use the time of a button press: hash2(board.micros() as u32, old_seed, scale). This setup has no network, RTC or ADC noise source. The main loop is quite small:
loop {
    if dirty {
        // LED stays lit while we generate and refresh, which is most of the
        // wall clock time — without it the badge looks frozen.
        board.led.set_high().ok();
        art::render(&mut board.display, &p, "A:gen B:seed C:inv");
        board.display.update().unwrap();
        board.led.set_low().ok();
    }
    let press = board.wait_for_press();
    dirty = p.handle(press, board.micros() as u32);
}
handle returns whether anything changed, so a button press that does nothing can skip the slow display refresh.
Making an interactive UI
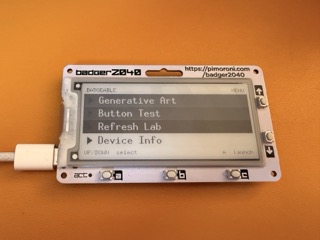
display.update() blocks until the refresh finishes. The uc8151 waveform tables allow 4500ms for Normal, 2000ms for Medium, 800ms for Fast and 250ms for Ultrafast. Faster modes leave more ghosting.
A full refresh flashes the panel black and back, which gets annoying on every button press. We can use partial_update to refresh a rectangle without that flash.
// Every band boundary below is a multiple of 8, and that is not cosmetic:
// `UpdateRegion::new` rejects any y or height that isn't.
const TITLE_H: i32 = 16;
const ROW_H: i32 = 24;
const FOOTER_H: i32 = 16;
Choose a row height that supports partial updates. Moving the caret then only needs to repaint and refresh the old and new rows:
fn move_to(&mut self, board: &mut Board, next: usize) {
    let prev = self.selected;
    if prev == next { return }
    self.selected = next;
    draw_row(&mut board.display, prev, false);
    draw_row(&mut board.display, next, true);

    // Partial refreshes don't fully reset the pixels, so faint remnants
    // accumulate. Spend a full refresh to clear them after this many.
    if self.partials >= GHOST_LIMIT {
        board.display.update().unwrap();
        self.partials = 0;
        return;
    }

    let (lo, hi) = if prev < next { (prev, next) } else { (next, prev) };
    if hi - lo == 1 {
        // Neighbours: one region spanning both beats two waveform cycles.
        board.display.partial_update(rows_region(lo, hi)).unwrap();
        self.partials += 1;
    } else {
        board.display.partial_update(rows_region(prev, prev)).unwrap();
        board.display.partial_update(rows_region(next, next)).unwrap();
        self.partials += 2;
    }
}
Future steps
E-ink keeps its image when powered off. A program could draw something and then sleep for most of the time, making long battery life possible. The buttons would also suit a small game.
Pimoroni's newer Badgeware range is more expensive, but includes batteries, cases, WiFi and a choice of screens.
Conclusion
If you have an unused microcontroller, this is a nice way to try it out. Claude handled the initial setup, leaving me to experiment with drawing and interaction.
Appendix: Some things to watch out for
Claude had already handled these details in my setup, but they may help if you run into problems:
- The framebuffer starts black. This crate maps
BinaryColor::Onto ink, and a zeroed buffer means ink everywhere. Clear it before drawing text. I used a small trait to keep the colour inversion in one place:
pub trait InkCanvas {
    fn set_ink(&mut self, x: i32, y: i32, ink: bool);
    fn fill(&mut self, ink: bool);
    fn fill_paper(&mut self) { self.fill(false) }
}

impl InkCanvas for Display {
    fn set_ink(&mut self, x: i32, y: i32, ink: bool) {
        if x >= 0 && y >= 0 { self.pixel(x as u32, y as u32, !ink) }
    }
    // …
}
- The USER button reads low when pressed. A, B, C, Up and Down read high. Convert these readings in the board code so the rest of the app can use
truefor a pressed button:
Buttons {
    a: self.a.is_high().unwrap_or(false),
    // …
    user: self.user.is_low().unwrap_or(false),
}
-
Partial updates need 8-pixel vertical alignment.
UpdateRegion::newrequiresyandheightto be multiples of 8, as each byte stores 8 vertical pixels.xandwidthhave no such restriction. -
Keep compatible dependency versions.
uc81510.2 usesembedded-hal0.2. This project pinsrp2040-halto 0.9.2, before its move toembedded-hal1.0. Upgrading it alone causes a trait-bound error atUc8151::new.